Think of an embroidery design like building a house. Without a solid foundation on shifting ground, top stitches sink, pull, and distort. In embroidery digitizing, underlay serves as that exact structural support. Skipping or misconfiguring it is a top reason amateur files fail, causing jagged lines and uneven columns that ultimately require emergency fixes from professional digitizing experts.
What Is Underlay in Embroidery Digitizing?
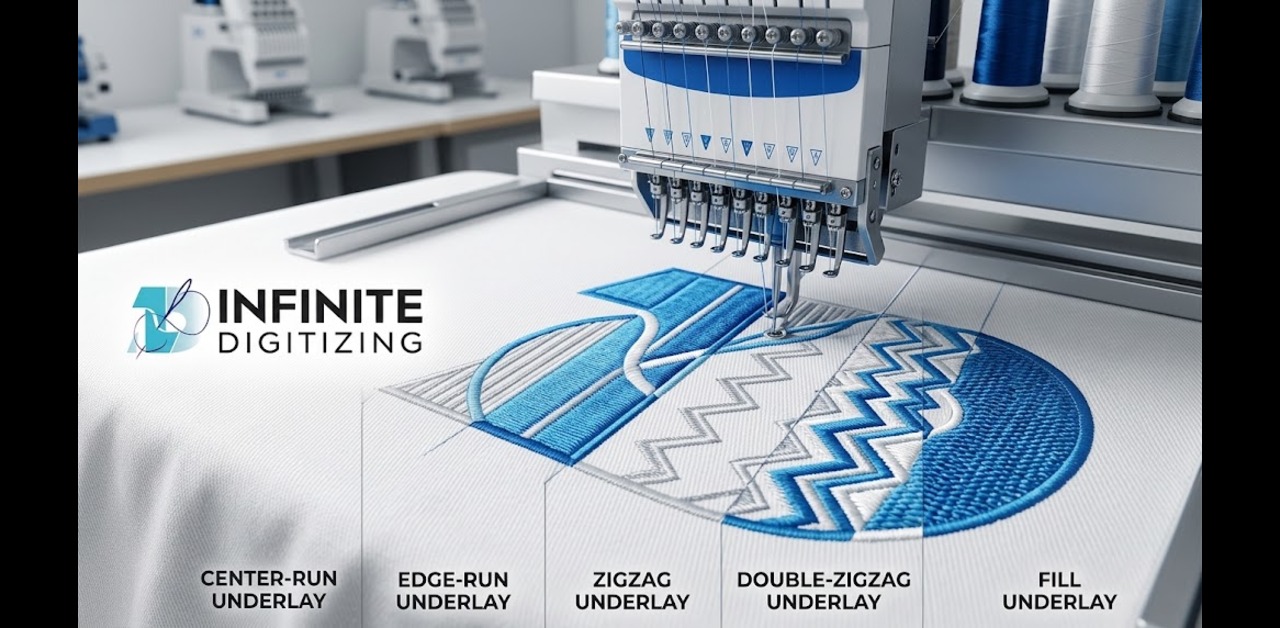
At its core, underlay consists of running stitches placed at specific spacing and directions beneath the main “visual” stitches (like satins and fills). Rather than just stitching blindly, a skilled program or technician uses underlay to lock down the material and minimize internal movement inside the hoop. It also handles density reduction, preventing heavy thread build-ups so that top stitches sit neat and flat instead of bulging out.
If you want to understand how this fits into the broader workflow, check out our guide on What Is Embroidery Digitizing?.
Why Underlay Matters for Clean, Pucker-Free Embroidery
Why can’t you just let the machine go straight to work? Without proper support, fabric acts like a living, breathing elastic band under the pressure of thousands of needle penetrations.
- Prevents Puckering: Once you unhoop a design, tight top threads naturally want to snap back to their resting state, causing the fabric to pucker and wrinkle. Underlay distributes this pulling force evenly.
- The “Break Wall” Effect: By plotting the underlay before the stitching of the primary columns, the underlay acts as a barrier to ensure that the top threads do not pull into the center of the columns.
- Fabric Stability: This is particularly important when embroidering on loosely woven fabrics such as polo shirts or golf shirts, where the fabric stretches much more horizontally than vertically.
For an insight into how various aspects work, check out our explanation on Kinds of Stitches in Embroidery.
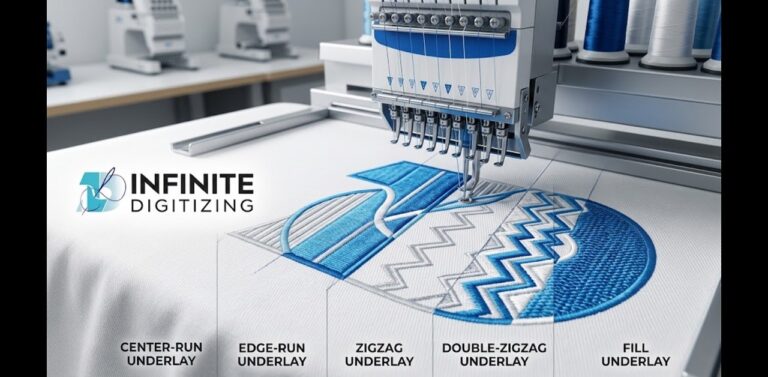
The 4 Main Types of Underlay (and When to Use Each)
All experienced professionals specializing in digitizing embroidery know that the choice of underlay involves compromise. You have to give sufficient stability to secure the design, but not so much as to make the garment too thick.
| Underlay Type | Best Column Width | What It Does |
|---|---|---|
| Center-Run | 1.5mm–2mm | Runs through the middle; used when space is too tight for edge placement. |
| Edge-Run | 2.5mm–3.5mm | Sits near the object’s edge; creates the “break wall” that stops pull. |
| Zigzag / Double Zigzag | 4mm and up | Secures the open middle area on wide columns; always laid before edge-run. |
| Fill-Stitch Underlay | Fill areas | Runs opposite direction to top fill stitch; secures open/unbordered edges. |
Order of operations is everything here. For instance, if you are working on a wide satin column, a zigzag underlay must go down first to pin down the center slack, followed immediately by an edge-run. Reversing that order will cause the zigzag to pull the edge-run completely out of alignment. Many complex files require a clever mix of these layers. To dive deeper into how tension affects these shapes, check out our guide on Push & Pull Compensation.
Underlay Placement: Getting It Right vs Getting It Wrong
Even the right style of underlay will fail if it is poorly positioned. Precision is what separates professional embroidery digitizing services from amateur garage setups.
- The Dead Center Mistake: If your underlay runs straight down the exact mathematical center of a wide satin column, it won’t stop the edges from pulling. Instead, it creates an awkward ridge that looks uneven and patchy.
- The Over-Edge Mistake: Placing your underlay too close to the outer border causes the foundational stitches to pop out past your satin border, ruining the clean visual edge of your logo.
- The Sweet Spot: Correct placement generally keeps the underlay roughly 0.4mm inward from the object’s outer edge. This creates a crisp, clean stitch-out where the border wraps cleanly over the foundation.
If you have ever received a botched design from a cheap automated generator where stitches are poking out everywhere, you know why businesses turn to professional embroidery digitizing services for a reliable fix.
Underlay Stitch Length by Fabric Type
When digitizing for embroidery, assuming that all fabrics are alike is guaranteed disaster. Although a 2.5mm stitch length serves well as the standard default setting for standard cotton tees, shifting to heavy or tricky materials requires adjusting your settings.
- Fleece and Terry Cloth: Because these fabrics have deep pile loops, shorter underlay stitches will instantly sink right out of sight and do nothing. You need longer stitch lengths that ride on top of the loops.
- Leather and Vinyl: Piercing leather too frequently with short stitches acts like a perforating wheel, actually tearing the material along your design lines. Lengthening your underlay stitches protects the medium from damage.
Ultimately, there is no single universal rule. Fabric weight, hoop tension, and object dimensions all dictate how you should fine-tune your parameters for Machine Embroidery.
Underlay for Tricky Surfaces: Caps & Curved Items
Embroidering flat fabric stretched across a flat hoop is one thing. Stitching a structured 6-panel baseball cap is an entirely different beast. Curved surfaces naturally distort standard underlay because the material shifts during hooping and sewing.
If you try to run a flat-surface file directly onto a curved cap, text and fine details often warp or completely disappear down the center seam. A skilled professional providing online embroidery digitizing knows to introduce extra vertical running stitches down the center seam area to anchor the fabric against the cap driver’s curve. This prevents shifting and keeps curved text looking smooth and readable.
Underlay vs No Underlay: What Changes
Skipping underlay to save a few hundred machine stitches might sound tempting, but the visual cost is massive.
- Without Underlay: You will immediately face registration errors, severe puckering, loose loops, and distorted columns, especially on large jacket-back designs where fabric has room to drift.
- With Underlay: You establish a stable mechanical base, reduce top-thread density buildup, and achieve a clean, professional finish that holds its shape wash after wash.
To read more about why foundational work matters, review our comprehensive overview on What Is Embroidery Digitizing?.
Letting a Professional Embroidery Digitizer Handle It
Figuring out the ideal underlay combination, stitch length, and pull compensation takes years of trial and error across countless fabric textures and machine brands. Why waste time troubleshooting thread breaks and ruined garments when you can hand the file over to an expert embroidery digitizer?
Infinite Digitizing offers premium embroidery digitizing solutions that remove all uncertainty, guaranteeing perfection on your first attempt.
Key Takeaways
Underlay is the real key to professional embroidery that turns the fickle fabric into a reliable quality canvas. Using the correct underlay combination for your particular fabric will give you a smooth result without puckering and misregistration. Trust us at Infinite Digitizing to map your custom underlay.
Infinite Digitizing delivers expert, custom-engineered underlay mapping to guarantee flawless, pucker-free embroidery on every single project.
FAQs
1. What is underlay in embroidery digitizing?
A: It is a foundational layer of stitches sewn before the main design to stabilize the fabric and prevent distortion.
2. What are the main types of underlay stitches?
A: Center-run, edge-run, zigzag (or double zigzag), and fill-stitch underlay.
3. When should you use zigzag underlay instead of edge run?
A: Use zigzag underlay on wide columns (4mm and up) to secure open middle areas, usually paired with a subsequent edge-run.
4. Does underlay increase stitch count and cost?
A: Yes, slightly, but it is necessary to prevent puckering, gaps, and ruined garments.
5. What happens if you skip underlay in a design?
A: You will likely face severe puckering, registration errors, loose loops, and distorted columns.